How do you start to understand the workings of an ERP system? By making one. In this biweekly column, we’ll make an ERP system and start at the core of it all: accounting.
This lesson will be longer than subsequent lessons, as I will have to do some background and definitions so everyone has an equal idea of what is going on.
Accounting Principles
Some of you may know basic accounting, but it is a good review for everyone. If you want a slightly better explanation, take a look at this video, as we’ll be following these four and their adventures in making the Huli Pizza Company sucessful:
Here’s the basic formula for all double-entry accounting.
Assets= Liabilities + Owner’s Equity
Often, it is written like this:
Assets - Liabilities = Owner's Equity
Owner’s equity is usually broken into
Equity = Investment + Revenue - Expenses
Capital investment is the money owners put into the business. Revenue is the money that comes into a business, and Expenses are the money that goes out of a business. Using letters to stand for each, the formaule expands to
Assets - Liabilities = Investment + Revenue - Expenses
Many accounting systems divide the Cost of Goods Sold (COGS) from other expenses, so we get Assets - Liabilities = Investment + Revenue - (Expenses + COGS)
Accounts, Debits and Credits
This formula gives us the following accounts
| Number | Account Name |
|---|---|
| 1 | Assets |
| 2 | Liabilites |
| 3 | Investment |
| 4 | Revenue |
| 5 | COGS |
| 6 | Expenses |
Any transaction can be written as a number and an account.
| Account | Amount |
|---|---|
For example, I can list these transactions as balanced transactions.
| Account | Amount |
|---|---|
| Asset | 1000.00 |
| Investment | -1000 .00 |
| Asset | 300.00 |
| Asset | -300.00 |
| Asset | 100.00 |
| Liabilities | -100.00 |
| Expenses | 300.00 |
| Asset | -300.00 |
| Expenses | 200.00 |
| Asset | -200.00 |
| Asset | 5000.00 |
| Revenue | -5000.00 |
| COGS | 400.00 |
| Asset | -400.00 |
While using negative numbers works, it does a lousy job of explaining what is happening. Part of the problem is how many negative numbers are involved. Expanding out the formula, we get:
Assets - Liabilities = Investment + Revenue - Expenses - COGS
With a little algebra, I can test for a zero in this equation to prove that everything balances. To keep it all on one line, I’ll use the first letter as an abbreviation:
A - L - (I + R - E - C) = 0
Now I’ll change everything to be addition:
A + -1 * L + -1 * (I + R + (-1 * E) + (-1 * C)) = 0
Simplifying the equation, I get
A + -L + -I + -R + E + C = 0
This leaves A lot of negative numbers still sticking around. However, it sets us up to use debits and credits. We use a debit, an increase in one account with a credit, which is a decrease in another account.
Because they are subtracted, the Liabilities, Investment, and Revenue become positive numbers if credited. Often, you’ll see the debits and credits in different columns of a table. So I’d change these transactions to:
| Account | Debit | Credit |
|---|---|---|
| Asset | 1000.00 | |
| Investment | 1000 .00 | |
| Asset | 300.00 | |
| Asset | 300.00 | |
| Asset | 100.00 | |
| Liabilities | 100.00 | |
| Expenses | 300.00 | |
| Asset | 300.00 | |
| Expenses | 200.00 | |
| Asset | 200.00 | |
| Asset | 5000.00 | |
| Revenue | 5000.00 | |
| COGS | 400.00 | |
| Asset | 400.00 |
Eliminating all the negative numbers.
Tables, Rows and Columns
With this theory in place, we’ll decide how to code.
I’ll use a simplified version of an architecture called model-view. You’ll find ERP systems written as stored data and code to connect all the data together and run the user interface. We’ll refer to the data, data management, and manipulation code as a model. The user Interaction parts we’ll call a view. We’ll be looking at both as we go through building LucaP.1
While this is covered more in-depth in SAP Business One: reporting and customization 2 and SwiftData Essential Training3, the model’s foundation, whether built on a Database like Microsoft SQL Server or directly in code, is a table.
Suppose we have the following table, similar to an Excel spreadsheet:
| Key | A | B | C | D |
|---|---|---|---|---|
| 1 | A1 | B1 | C1 | D1 |
| 2 | A2 | B2 | C2 | D2 |
| 3 | A3 | B3 | C3 | D3 |
| 4 | A4 | B4 | C4 | D4 |
In database nomenclature, columns are also known as fields. However, in code, they are often called properties. I’ll use rows for both to prevent confusion, as they have the same function.
Columns are the kind of data you are saving, such as the Description, Date, Amount, and Credit/Debit. Replacing the headers in the table I get:
| Key | Date | Description | Amount | Credit/Debit |
|---|---|---|---|---|
| 1 | A1 | B1 | C1 | D1 |
| 2 | A2 | B2 | C2 | D2 |
| 3 | A3 | B3 | C3 | D3 |
| 4 | A4 | B4 | C4 | D4 |
One critical column here is the Key. A key is a unique identifier that can find a row. In SAP Business One, DocEntry and DocNum are common keys used in tables. In the SwiftUI world, we use id as the column name for this column to help the system use rows effectively.
Rows, often referred to as Records, contain data from all columns. Adding some rows in, we get this table
| id | Date | Account | Amount | Debit/Credit |
|---|---|---|---|---|
| 0 | 12/9/2024 | Asset | 1000.00 | .debit |
| 1 | 12/9/2024 | Investment | 1000.00 | .credit |
| 2 | 12/9/2024 | Asset | 300.00 | .debit |
| 3 | 12/9/2024 | Asset | 300.00 | .credit |
Data types
You’ll notice this table differs from the above in the columns I used. Each column has a Data type, usually referred to as type. This is a representation Of the data. The id in my example is an integer,Date a date, the Account a string, the Amount a double precision decimal, and the Credit/Debit a custom type
Much of programming is defining custom types like Credit/Debit and what they do. One of the simplest custom types is an enumeration or enum; these types have a discrete set of constant values such as debits and credits. I could define a type of CreditDebit in Swift like this:
enum CreditDebit:Double{
    case credit = -1
    case debit = 1
}
I’ll use the value as a multiplier to the amount to get the sign right on the amount. This is my strategy for handling credits and debits. It is not the only strategy. As we did earlier, I could use positive and negative values for the account amounts. I could also make two columns, one for credit and one for debits. All are right. However, each has its own issues in implementation.
Types do not play well with other types. Often, you’ll have to convert them using a function or computed property. These are small programs that run within the type to do something. I created a computed property named Name to change the CreditDebit type to a text string.
 enum CreditDebit:Double{
    case credit = 1
    case debit = -1
}
    var name:String{
        switch self{
        case .credit: "Credit"
        case .debit: "Debit"
        }
    }
}
While enums work for constants, they do not work well for more dynamic data like rows. I can make a type that describes a row by its columns and then make a collection of those rows. This is defined either by a class or a struct. For storage reasons4, I’m using classes here.
Classes have two parts: properties, the columns of the table and othere values, and methods, which are actions we apply to the table based on the data in them. There’s an in-between part called a computed property, which returns values based on properties alone, unlike a method that can use external values. Here’s the columns defined:
class JournalEntry:Identifiable{
    var id: Int
    var date: Date
    var description:String
    var amount:Double
    var creditDebit:CreditDebit
}
In Swift and most computer languages, this will cause error messages, as the class needs initial values. You must explain to it what to do when creating a new row. In a method called an initializer, defined as init(), you define some data automatically, and some tell the row what to store. Here’s the class with the initializer.
var globalJournalEntryID = 0

class JournalEntry:Identifiable{
    var id: Int
    var date: Date
    var description: String
    var amount: Double
    var creditDebit: CreditDebit

    init( description:String,amount:Double,creditDebit:CreditDebit){
        self.id = globalJournalEntryID
        globalJournalEntryID += 1
        self.date = Date()
        self.description = description
        self.amount = amount
        self.creditDebit = creditDebit

    }
The things we assign to the initializer is in parentheses and are called either arguments or parameters. Here, we add the description, the amount, and if it is a credit or debit. The date and ID are generated automatically.
The generation of the id has a problem. I have to store the current id to make it work, but I have to do that outside the class. Inside the class, it will always be 0. While it’s a bad idea for final projects, adding a global variable for temporary testing is an okay practice.
var globalJournalEntryID = 0 //temporary for building
I’ll also add a method to this class for any math I do that needs the negative and positive from credits and debits:
 func numAmount()->Double{
        return amount * creditDebit.rawValue
}
The method starts with func and the name of the method, followed with parentheses like init did. In this case, I have none, so they are blank. After that, is an arrow shape made of -> and the type for the value that I will return, in this case Double.
The function uses a built-in computed property of enums rawValue, which returns the value I assigned to each enum case. I multiply that by the amount and return that value.
Testing the table.
The next step is to test if this works. I will need test data and a way to output it.
I’ll create an array of Journal Entries, a type that sequentially collects entries of a single type separated by commas. I’ll use the table we created earlier to create an array of entries.
var testEntry = [
    JournalEntry(description: "Capital", amount: 1000, creditDebit: .credit),
    JournalEntry(description:"Assets", amount: 1000, creditDebit: .debit),
    JournalEntry(description:"Assets", amount: 300, creditDebit: .debit),
    JournalEntry(description:"Assets", amount: 300, creditDebit: .credit),
    JournalEntry(description:"Assets", amount: 100, creditDebit: .debit),
    JournalEntry(description:"Liabilities", amount: 100, creditDebit: .credit),
    JournalEntry(description:"Expenses", amount: 300, creditDebit: .debit),
    JournalEntry(description:"Assets", amount: 300, creditDebit: .credit),
    JournalEntry(description:"Expenses", amount: 200, creditDebit: .debit),
    JournalEntry(description:"Assets", amount: 200, creditDebit: .credit),
    JournalEntry(description:"Asset", amount: 5000, creditDebit: .debit),
    JournalEntry(description:"Revenue", amount: 5000, creditDebit: .credit),
    JournalEntry(description:"COGS", amount: 400, creditDebit: .debit),
    JournalEntry(description:"Assets", amount: 400, creditDebit: .credit)
]
For the output, I’ll use SwiftUI 4. All SwiftUI Views start similarly, creating a View struct and a preview.
import SwiftUI
struct EntryTestView: View {
    var body: some View {

    }
}

#Preview {
    EntryTestView()
}
I’ll add the test entries.
import SwiftUI
struct EntryTestView: View {
    var journalEntries:[JournalEntry] = testEntries
    var body: some View {

    }
}

#Preview {
    EntryTestView()
}
Within the curly braces for the body, I’ll add the SwiftUI Code for iterating through the entries, a List, which shows every row as a entry
struct EntryTestView: View {
    var journalEntries:[JournalEntry] = testEntries
    var body: some View {
        List(journalEntries){entry in

        }
    }
}
We use an HStack to display the columns across the display for each row. SwiftUI outputs values with the Text object
 HStack{
                Text(entry.id,format:.number)
                Text(entry.date,format:.dateTime)
                Text(entry.description)
                Text(entry.numAmount(),format:.currency(code: "usd"))
            }
Text usually prints text and complains if data is not text; adding a second parameter, format, gives us the option to format the type correctly. The .number is for numbers like our ID. .datetime shows a date, and .currency shows a currency based on a currency code, here in US dollars.
SwiftUI, by default, starts in a struct named ContentView. I rewrote the template content view to add a title with an image5 and EntryTestView()
 import SwiftUI

struct ContentView: View {
    var body: some View {
        VStack {
            HStack{
                Image(systemName: "book.pages.fill")
                .imageScale(.large)
                .foregroundColor(.accentColor)
                Text("LucaP")
                Spacer()
            }
            .font(.title2).bold()
            EntryTestView()
        }
    }
}
Showing Credits and Debits
Its easier to read credits and debits as two columns. In my Text statements, I can use a conditional like if…else and set the width of the amount so I get two columns, replacing the last Text statement of the code above.
 HStack{
                Text(entry.id,format:.number)
                Text(entry.date,format:.dateTime)
                Text(entry.description)
                if entry.creditDebit == .debit{
                    Text(entry.amount,format: .currency(code: "usd")).frame(minWidth:100)
                } else {
                    Text(" ").frame(minWidth:100)
                    Text(entry.amount,format: .currency(code: "usd")).frame(minWidth:100)
                }
            }
The code uses a width of 100. if there is a credit, it sticks a blank Text with the width of 100 in front of the amount. And this gives us a rough way of doing columns for credits and debits.
The code runs automatically in the preview, but I’ll run it as a full iPad app:
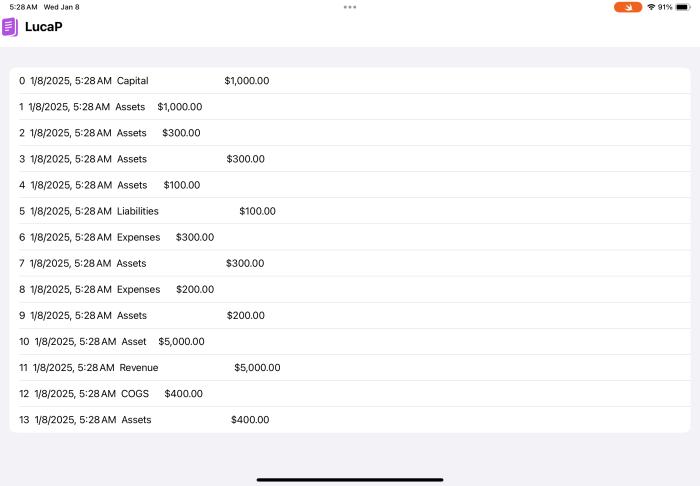
We get the entries.
We’ve covered a lot of ground in this first piece. We can list transactions using credits and debits based on the basic accounts. In the next few installments, we’ll enhance this by adding more detail to the accounts with the chart of accounts, and then build a more robust journal.
The New Code
For those who are into the programming part of this, I’ll have a download each week, and post the code discussed ready for cut and paste here at the end of the installment. You’ll find the download here on Github
ContentView.swift
import SwiftUI

struct ContentView: View {
    var body: some View {
        VStack {
            HStack{
                Image(systemName: "book.pages.fill")
                .imageScale(.large)
                .foregroundColor(.accentColor)
                Text("LucaP")
                Spacer()
            }
            .font(.title2).bold()
            EntryTestView()
        }
    }
}
CreditDebit.swift
import Foundation

enum CreditDebit:Double{
    case credit = -1
    case debit = 1

    var name:String{
        switch self{
        case .credit: "Credit"
        case .debit: "Debit"
        }
    }
}
JournalEntry.swift
import Foundation

var globalJournalEntryID = 0

class JournalEntry:Identifiable{
    var id:Int
    var date:Date
    var description:String
    var amount:Double
    var creditDebit:CreditDebit

    init( description:String,amount:Double,creditDebit:CreditDebit){
        id = globalJournalEntryID
        globalJournalEntryID += 1
        self.date = Date()
        self.description = description
        self.amount = amount
        self.creditDebit = creditDebit


    }

    func numAmount()->Double{
        return amount * creditDebit.rawValue
    }


}

var testEntries = [
    JournalEntry(description:"Capital", amount: 1000, creditDebit: .credit),
    JournalEntry(description:"Assets", amount: 1000, creditDebit: .debit),
    JournalEntry(description:"Assets", amount: 300, creditDebit: .debit),
    JournalEntry(description:"Assets", amount: 300, creditDebit: .credit),
    JournalEntry(description:"Assets", amount: 100, creditDebit: .debit),
    JournalEntry(description:"Liabilities", amount: 100, creditDebit: .credit),
    JournalEntry(description:"Expenses", amount: 300, creditDebit: .debit),
    JournalEntry(description:"Assets", amount: 300, creditDebit: .credit),
    JournalEntry(description:"Expenses", amount: 200, creditDebit: .debit),
    JournalEntry(description:"Assets", amount: 200, creditDebit: .credit),
    JournalEntry(description:"Asset", amount: 5000, creditDebit: .debit),
    JournalEntry(description:"Revenue", amount: 5000, creditDebit: .credit),
    JournalEntry(description:"COGS", amount: 400, creditDebit: .debit),
    JournalEntry(description:"Assets", amount: 400, creditDebit: .credit),


]
EntryTestView.swift
import SwiftUI


struct EntryTestView: View {
    var journalEntries:[JournalEntry] = testEntries
    var body: some View {
        List(journalEntries){entry in
            HStack{
                Text(entry.id,format:.number)
                Text(entry.date,format:.dateTime)
                Text(entry.description)
                if entry.creditDebit == .debit{
                    Text(entry.amount,format: .currency(code: "usd")).frame(minWidth:100)
                } else {
                    Text(" ").frame(minWidth:100)
                    Text(entry.amount,format: .currency(code: "usd")).frame(minWidth:100)
                }
            }
        }
    }
}

#Preview {
    EntryTestView()
}
Footnotes
- For the developer out there. Yes, I’m seriously oversimplifying, but then again, it can be argued that Apple championed both MVVM and MVC and never used either, oversimplifying to Model and View or Model and ViewController respectively. If you have no idea what I’m talking about, take a look at this video from SwiftUI Essential Training ↩︎
- The first half of the courseSAP Business One: reporting and customization Concerns SQL reporting and databases in SAP Business One. ↩︎
- The SwiftData Essential Training course covers the basics for the newest form of persistent data in Apple ecosystems and requires classes for tables. As I mentioned in that course, I develop my code with arrays first, then add persistence. It tends to solve many of my bugs earlier than later and makes changes to the columns a lot simpler. ↩︎
- See SwiftData Essential Training For a more extensive explanation. A shorter one is this. Structs retain their data while classes use reference to their data. To store data in SwiftData, we need to use references and, thus, classes for any table we create. This project’s UI, created with SwiftUI, will be structs. So simple version is classes for models and structs for views ↩︎
- For More on SFSymbol images, see The SwiftUI Essential Training video for SF Symbols ↩︎
